Excel 2013 has lot of information grouped under different TABS and this page provides information about the important features for an average user or a beginner. Microsoft has provided detailed information about each tab and their usage. For more information, you have to visit www.Microsoft.com.
Explanation for the path that we are using in this section:
Example: HOMEEDITINGFIND & SELECTFIND
Where HOME = TAB; EDITING = GROUP; FIND & SELECT = DROP DOWN LIST BOX IN THAT GROUP; FIND = COMMAND BUTTON.
FILE TAB:
FILENEW: To create a new file.
FILEOPEN: To open a file that is already saved.
FILESAVE: To save a file that you are currently working.
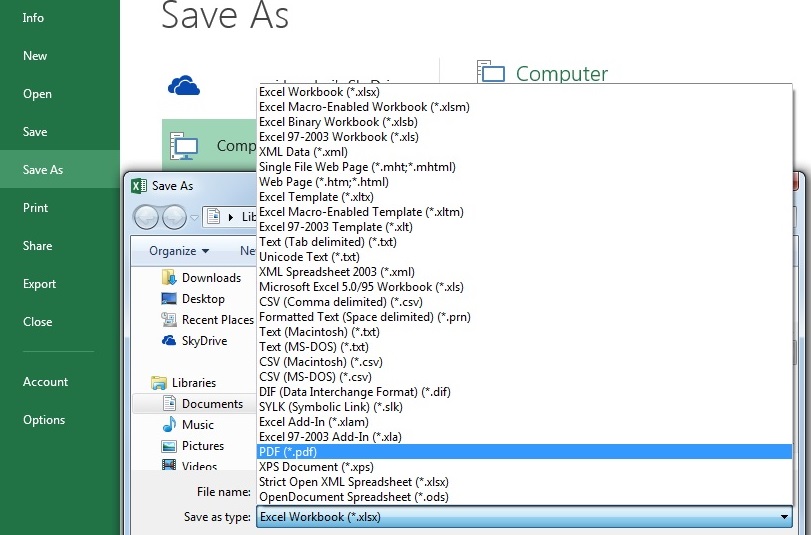
FILESAVE AS: To save excel in the following types.
Saving Files in Different Formats
FILEPRINT: To print after setting the page size.
FILESHARE: To send the document as an attachment, PDF, XPS, internet fax.
FILEEXPORT: To export as PDF or XPS document.
HOME TAB:
HOMEEDITINGFIND & SELECTFIND: To search and find.
HOMEEDITINGFIND & SELECTREPLACE: To search. Find, and replace.
HOMEEDITINGSORT & FILTERSORT A TO Z: To sort in ascending order: smallest to largest. Number columns, text columns, date columns etc. can be sorted.
HOMEEDITINGSORT & FILTERSORT Z TO A: To sort in descending order: largest to smallest.
HOMEEDITINGSORT & FILTERCUSTOM SORT: To sort as per your requirements. You can add one column or two columns etc. and sort it by ascending or descending level.
HOMEEDITINGSORT & FILTERFILTER: It is just like a WHERE CONDITION. When you apply a filter, all columns are selected with drop down list. You can choose the value and analyze by drilling down the data.
HOMEALIGNMENTWRAP TEXT: If a text is so long, you cannot see the entire text and you have to use scroll bars. With wrapping, you can see the text in multiple lines in one single cell.
HOMEALIGNMENTMERGE & CENTER: To merge the cells.
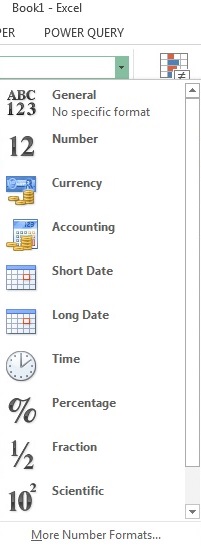
HOMENUMBERGENERAL: (Refer the below diagram)
When you click the drop down box General (by default, General Value is displayed), you can see the following options: General, Number, Currency, Accounting, Date, Time, Percentage, Fraction, Scientific, etc.
Number: Column represents number format and you can adjust the decimal places.
Currency: You can select the currency like US Dollar, Euro, Pound, Rupee etc.
Date: You can set the date format by which data has to be displayed.
Time: You can set the time format
Percentage: You can set the percentage in an accurate manner based on the decimals.
Text: You can set it as text column.
Special. You can set phone number, social security number, zip code etc.
Custom: You can also use custom options to change the format (for example date).
Number Formatting
INSERT TAB:
INSERTTABLES:
To create a table: select the array (rows and columns) and click table. After creating the table, you can enter additional data by adding rows and columns or delete rows and columns that are not required. If you want to add columns or rows, right click and from the menu, click insert.
Insert rows and columns in a table: a) You can insert an entire row; b) You can insert an entire column; c) You can shift cells right; d) You can shift cell down.
Delete rows and columns in a table: SIMILARLY YOU CAN DELETE A ROW, COLUMN, CELLS by using the DELETE OPTION IN THE RIGHT CLICK MENU.
INSERTILLUSTRATIONS: To work with illustrations.
INSERTCHARTS: To work with charts.
INSERTFILTERS: To work with slicer, timeline.
PAGE LAYOUT TAB:
PAGE LAYOUT: Used for setting margins, orientations, size, print area, breaks and prints titles.
PAGE LAYOUTPAGE SETUPORIENTATION: You can set page orientation as LANDSCAPE or PORTRAIT.
PAGE LAYOUTPAGE SETUPMARGINS: You can set top margin, left margin, right margin, bottom margin, footer margin, header margin based on the page size that you want to print.
FORMULA TAB:
FORMULA: This tab contains functions and different options. In the next sections, you will read it in a detailed manner about logical functions, text functions, date time functions, lookup functions, arithmetic functions etc.
VIEW TAB:
FREEZING PANES: Assume a worksheet contains data for 10 pages, which has several rows and columns with headers.
When you scroll down, after the first page you may not see your headers, which will be difficult for you to understand the nature of the data. Since headers are always present on the first row, you can freeze the top row so that it is always visible. Place the cursor on the second row and click the FREEZE TOP ROW. Click VIEW TABWINDOWFREEZE PANES (DROP DOWN LIST BOX)FREEZE TOP ROW.
Similarly, if you need to freeze the first column, place the cursor on the second column and click the FREEZE TOP COLUMN. Click VIEW TABWINDOWFREEZE PANES (DROP DOWN LIST BOX)FREEZE TOP ROW. The first column will be always visible when you scroll to the right.
If you want to freeze the top row and column, you can do it by Click VIEW TABWINDOWFREEZE PANES (DROP DOWN LIST BOX)FREEZE TOP ROW.
VIEW NORMAL AND PAGE BREAKVIEW:
When you click the VIEWAGE BREAKVIEW, you can see how your pages are aligned. When you take print out, you can use this PAGE BREAKVIEW.
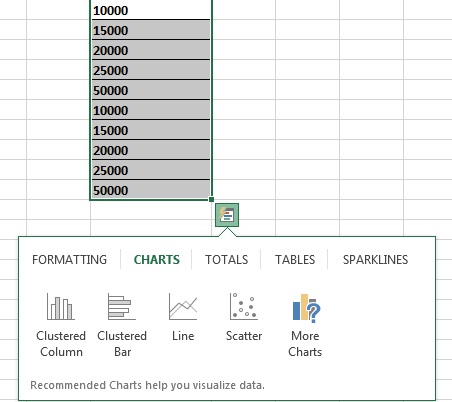
QUICK ANALYSIS TOOL:
Select the cells on which you need to do some tasks. In the bottom right corner of your selection, you can see the quick analysis tool, which contains: FORMATTING, CHARTS, TOTALS, TABLES, and SPARKLINGS.
Whenever you click each tab in Quick Analysis TAB, you see different options.
For example, in CHARTS TAB, you can see clustered column, clustered bar, line, scatter, and more charts.

 Microsoft Excel 2013 Tutorial for Beginners